Monday, September 27, 2010

Dog Peephole Reveal

So, I buckled down and installed Frank's doggy viewing window a couple weeks ago and it was a great project since it was cheap, quick, and easy!


All that I needed for this project was a 8ft piece of exterior molding,a 45 degree triangle, and some fencing link. Luckily my friend/neighbor had an electric jigsaw and I had the screw gun, wood screws, and woodglue lying around.

First I cut my 8ft piece of molding into 18" lengths with 45degree ends so they could be put together to make my frame. Once I had my wood cut at an angle I used a little wood glue to hold the corners together while I nailed the together to complete my frame.

Next I unrolled my fence link and used snippers to cut it to size. Once I had the fence link all rolled out I screwed it to the frame.

After I got comfortable using the saw on my frame it was on to the fence. I figured it would be best to put the hole in the door so when I decide to move I can just replace the gate rather than the whole fence. I had to measure Frank to get a comfortable viewing height (take it from me I've been in many a home where the peep hole is designed for people of "average height" so I end up all hunched over)then I measured a hole slightly smaller than my frame and cut away!

TA-DA! Framed out personal Frank viewing window! Here is Frank on the left and his partner in crime Beans on the right checking out the new window! Beans prefers to be standing when she looks out the window, and not only is it just right for Frank but his roomie Tahnee can see comfortably out it as well!

Friday, September 10, 2010

Doggy Porthole


My dog Frank(above in doggy icu) was hit by car on August 5th, and after his brush with death and miraculous recovery I have decided that my next diy project should have his comfort in mind. That is why I have decided to install a viewing window in the fence for him.
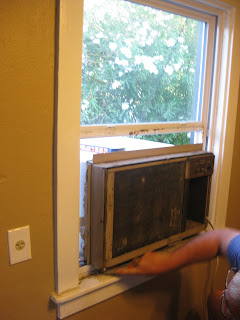
Now there are a few option in terms of what can be installed for Frank's viewing pleasure, the first(pictured above)is the 'Pet Peek' which seems to be a kind of doggy porthole. This is the most expensive option at a whopping $29.98 plus shipping, however the product claims to include everything needed for install and I will admit the trim around the opening is appealing. What's not appealing is the amount of slobber I can imagine would end up in that acrylic dome. Since the 'Pet Peek' seems to involve the least amount of diy I was on the lookout for what else I could do that would be more budget friendly and let me get my hands a little dirty, that's when I found this. . .


Over at http://societygarlic.blogspot.com/ they had made and then stored this great dog viewing screen in the attic for a bit before installing it in their fence much to the delight of the family dog. Now, this option appears to do the trick and be much more diy while having the added bonus of being easy on the pocket book.

There is one more option, however this seems very labor intensive and quite a bit higher on the skill level. The people at http://dogwindow.weebly.com/ have installed a dog window that goes all around their fence. It's a bargain however since the plans are available for purchase for only $7. I have to admit this option looks like the most fun for Frank, but the open space without any mesh looks like a dog bite insurance claim waiting to happen.

Back to Frank. Here is a healthy Frank before his accident, he is doing much better after 5 weeks of recovery and is ready to resume his role as king of the back yard. There are two places in my yard where I plan to install Frank's window a small side yard fence and the fence that views the driveway and neighbor's side house. I know what you're thinking, the driveway?! What kind of silly dog would want to be able to see the drive way, that would be Frank. To read more about Frank's accident please visit http://www.giveforward.org/frank


Hopefully this weekend I'll tackle this fun project for Frank. Check back to see the results of this just for Frank diy.

Saturday, September 4, 2010

Goodbye Window AC Unit!


Okay, I've been MIA from my DIY blog since the summer began, but let me tell you I have still be at the home improvement, in fact I've been doing so much DIY that I haven't had time to blog about it!


One of the first DIY projects of the summer was removing the really, really OLD and no longer functional window ac unit. Unfortunately the window did not have a sash (the part would close if the ac unit weren't there) so I had to buy a new custom sized window for $325 to replace the entire thing! Below you can see the ac unit after the plywood/cardboard surrounding it had been removed. Yes, the only thing separating the elements from me and the inside of my house was some soggy cardboard, not very energy efficient.


My dad was called in to help with this diy as well . . . I know not entirely diy, but removing a 500lb dinosaur and putting in a brand new window was a little out of my skill and strength range.

On the left is what we were dealing with on the outside of the house some pretty intense bolts screwed directly through the vinyl siding and into the exterior of the house.


After removing the original molding from the interior side of the window we them removed the exterior aluminum molding to allow for removal of the unit, which took some serious strength aka my dad, so i stood back and watched while he literally shoved the unit out the window and onto the driveway.


There's my dad looking pleased with his handy-work and slightly upset that I'm taking pictures instead of working!


So, after we got the ac unit out it was time to get out the half a window, with a lot of prying hammering and crow bar-ing it finally came out!

Now it was time to install the new (and expensive) window that I had custom ordered from the same company that installed the rest of the windows. I would tell you what company it was, but they were insane. Not bad customer service but actually certifiably insane, the woman at the front was out of her mind.
And, after doing some wood putty repair on the damaged window sill, installing the molding and painting it, I hung up the wood blinds and put the dining room back together. . .


Thursday, April 29, 2010

Wall Furnace Be-gone


As promised here is the entry on how I erased all memory of my lack or central heat and air, okay half the memory since I still have a hideous window ac unit that is non-functional.
Removing the wall furnace left a gaping hole between my itty bitty hall way and my living room, essentially making my already small home actually seem smaller. On the plus side, you could see the living room television from the bathroom. . .

I had planned to take this on as a total DIY but my father (former wood shop teacher) warned against. So I lived with the hole 2 weeks until good ol' dad could come help me.


So the first step to patching the hole in my PLASTER wall was measuring the length of the lathe, or little wood boards in the wall that hold up the plaster. I measured the lathe so my dad could cut down 2x6 board to "true" 2 x4 size. apparently over time the size of 2x4s has evolved to match up in size with the width of drywall so it actually measures 1.8 x 3.5 or something crazy.


My dad and I then had to frame out the hole with our "2x4s' which included notching out grooves for the gas and electrical line which meant using the skill saw late into the Friday evening (great way to meet your neighbors).


My original plan was to install built in nick knack shelves on the living room side of the "hole", pictured above. That lovely black plastic pipe in my wall ended all that dreaming. It was far too difficult to build shelves around the existing gas line that had been utilized by the heat and ac guys. Also along side the gas line is the electrical for my thermostat.


After all the framing (2hrs of labor) it was time to put up the dry wall! Yep you read that right I patched a hole in my plaster wall with dry wall aka cement board. After cutting it to size my dad and I (mainly my dad) nailed the drywall to the stud frame we had built.


So after the drywall was in place on both sides of the hole, it was time to put on the mud, I'm not so sure what the real name is since my father insisted on calling it mud but I know it wasn't plaster. This job was pretty messy but definitely fun since it meant the end was near! After putting on 2 layers of mud it was time to tackle texturizing. . .


see that nifty roller at the bottom of the picture? that is a paint texturizer that I picked up at Home Depot for a whopping $7. I layered the mud on pretty thick and gently rolled the texturized roller over it and here is the finished product:


The only thing left to do is haul out the paint from the garage and cover it up. Sadly I only have a mobile upload of the almost finished product, here it is:


Thursday, April 22, 2010

Window Treatments Part Deux

Since we were talking about window treatments earlier today I thought I would mention one of my weekend DIY activities, it was so quick and easy I almost forgot to take pictures and document it for all 5 of my followers!
This is the awful, terrible, no good BEFORE photo the lighting was clearly an issue hence the need for a window treatment . . .

So, while my Dad was in town to help me patch my wall furnace hole we went by Home Depot to get some last minute supplies for the patching and I happened to swing by the window treatment section with the exact measurements of the bamboo blinds I needed for my bathroom.
2 pencil marks and 4 screws later and it was up!

TA-DA! Here's the AFTER with perfectly fitting bamboo blinds in my orange bathroom. Yes, I chose that orange color and yes I still like it after 5 months. I think the bamboo shade looks great if I do say so myself. Here's to window treatments!


Window Treatments


Ignore the giant brown leather couch in the foreground of the picture and look to the upper left hand corner at my corner window. This is the only window/windows in my large 10x14 living room. I don't mind it too much since if I had a giant picture window I would be looking out at a moderately busy street.


I have scoped out some hardware at IKEA that will make that corner manageable so I don't have to jam two sets of hardware into the corner, so now the next step is selecting curtains for the window.


Step 2 on my window covering project is to install curtains to layer over my classic faux wood 2inch white blinds. I have 3 options for curtains from the amazing Cost Plus1. Vivian Floral Curtain Panel is the brightest option with the most color and pattern. I suspect I'm in desperate need of both color and pattern in my living room since I have that huge leather couch but I am a little hesitant to jump in head first with these window treatments.


2. Bird and Botanical Burnout Curtain Panel The second option is a little more moderate as far as I'm concerned, it has pattern and color but both are much more subtle than the first option. I like the light airy feeling of these curtains and I'm not as worried about them clashing with my area rug.


3. White Cotton Voile Curtains these happen to be the best deal financially since you get 2 panels for $24.99 whereas the other curtains give you just one panel for the same price. Again, I like the light feeling of these curtains and I really like the notion that I don't need to know much about combining color and pattern.


To remind you all what the main color and pattern of my area rug is here is a visual :


HELP! What curtains should I get?!?!

Monday, April 12, 2010

Central Heat and Air!


So, the same weekend that the pergola and deck were installed I used up the remainder of my new home buyer credit to have central heat and air installed in my 1941 home. On the left is the brand new return in my hallway ceiling.


Originally I had a cute little company,complete with glossy brochures and magnets, come in and meet with me to discuss the cost of putting in all the duct work and cutting the vents in the ceiling plus installing the unit. While all the goodies and matching tshirts were nice the price was not. The price was going to end up being more than my entire refund leaving me to ask SMUD for financing. booooo. Plus the guy was trying to sell me a top, top, top of the line unit which was completely unnecessary for the square footage, price, and location of my home but he works on commission. . .


That's when I called my old landlord who happens to be a construction manager for a home builder. He pointed me in the direction of the amazing KVACH heating and air guys. No glossy brochures or magnets, but great service and price!! The guys are brothers who immigrated from Uzbekistan, but usually tell people they're Russian to avoid confusion. They got me a middle of the line factory priced unit from Day and Night.

The guys warned me that it would be "very dusty" but for some reason that just didn't sink into my brain. Here is the inch layer of plaster and insulation that landed on my stove top after Steve cut the vents pictured below in my kitchen.


Since I had central heat and air put in the guys were nice enough to remove the existing wall furnace from my place. Unfortunately it has left a gaping hole in between my living room and hallway. Easy enough to patch up right? WRONG! My walls are lathe and plaster not drywall. And according to my father the 2 x 4 in the wall is original from 1941 so it measures 2 x 4 instead of the 1.8 x 3.5 (or something like that) that 2 x 4s now measure. I'll update you on how that patching up goes after my dad comes up to help this weekend. For now you can watch tv from the toilet, something I'm sure would be very useful if men lived in my house.

The old ac unit in the dining room window will soon be on it's way out as well and I will let you know how that goes. For now my roomate and I are just enjoying the fruits of Kvach's labor, you know vents in every room, a programmable thermostat. . .ahh the good life.

Wednesday, April 7, 2010

Backyard Before and During

Being new to blogging it has taken awhile to catch on to things. Since I was so busy participating in the renovation of my backyard I failed to keep you guys updated in a timely manner. Here is what I had before and a bit of how it looked going up, after pictures to come later.


BEFORE. . .


The lumber needed for the pergola and deck was dropped of the night before the projects started. The man from the lumber yard had gotten lost and was angry so he kindly dumped the entire load of lumber in my front yard and driveway.


Here is the existing lattice work that the previous owner smartly installed and grew vining plants up. Unfortunately they neglected the big dirt patch/ mud hole directly in front of the very nice lattice. Here is where I planned to place the deck.
Speaking of, here are the plans for the deck. I'll take credit for the creative vision, but the measurements and building were all done by my trusty carpenter and local Guatemalan Annel.
For everyone's inquiring mind here a longer shot of the back porch, pergola was installed over the existing cement pad and deck was built directly to the right of the cement.
DURING. . .


Once my trusty carpenter transferred the lumber to the backyard we got started on painting the pieces for the pergola. That paint job took about 4 hours longer than I had expected excluding a pit stop for more paint at home depot and lunch at Pita Pit.


The base of the deck was constructed with pressure treated lumber (that's what the green hue is).

The pergola went up on Saturday and the remainder of the deck was built on Sunday, seriously this all happened in 2 DAYS! Below is the pergola as it went up, hopefully this answers the question "what is a pergola" it is a structure that has a slatted roof to provide shade.

Lastly here is a long shot of the back of the house as the pergola was going up. . .you'll have to hold your breath for the after pictures. I don't want to post them until I finish painting the deck, which means I'll have to start painting the deck.